是时候抛弃 Iterm2,拥抱 Kitty 了
为什么选择 Kitty
我是多年的 Iterm2 用户,但是最近我决定抛弃 Iterm2,拥抱 Kitty。 对我来说 Iterm2 有几个让我比较难受的问题:
- 性能问题:iTerm2 是用 Objective-C 编写的,在处理大量输出时会明显感到卡顿
- 快捷键限制:在 macOS 上,没办法完全掌控 CMD 键的快捷键映射,我相信每个 vim 用户都感受过不能在 vim 里面充分使用 CMD 键的痛苦
- 配置方式:iTerm2 的配置主要依赖 GUI 界面,不够灵活,也不便于版本控制,尤其是我需要频繁的切换不同的工作环境,每次都需要重新配置,非常麻烦
而 Kitty 则完美解决了这些问题。它是一个用 C 和 Python 编写的现代化终端模拟器,具有以下优势:
- 极致的性能:GPU 加速渲染,处理大量输出时依然流畅
- 完全可编程:所有配置都通过文本文件完成,支持类似 Vim 的键位映射
- 强��的命令行接口:可以通过命令行控制窗口、标签页等
- 完整的键盘控制:包括 Cmd 键在内的所有按键都可以自由映射
安装 Kitty
在 macOS 上,你可以通过 Homebrew 安装 Kitty:
1
brew install --cask kitty
安装完成后,你可以在应用程序文件夹中找到 Kitty,或者直接通过 Spotlight 启动它。
基础配置
Kitty 的配置文件位于 ~/.config/kitty/kitty.conf。安装之后,会自动创建这个文件。 里面全是关于如何配置各种选项的注释,你可以根据需要进行配置。
刚安装完 kitty 之后如果你打开他,会感觉很挫,丑丑的,平平无奇,尤其是他的 tab 栏,简直丑到爆。 但是别着急,我们慢慢来玩,慢慢让你感受到他的神奇。
字体
先来个字体,字体是终端的灵魂,字体选的好,终端颜值才能高。
kitty 提供了一个命令行工具来列出所有可用的字体:
1
kitty list-fonts
推荐我最喜欢的字体 Nerd Fonts, 这个字体是专门为编程设计的,非常好看。
你可以从里面选择一个自己最喜欢的安装到 macos 系统里面,这样在使用 kitty list-fonts 的时候,就会看到你安装的字体了。
kitty list-fonts 命令做得事情本质上还是修改 ~/.config/kitty/kitty.conf, 你也可以直接修改这个文件。
我选择了 ComicShannsMono Nerd Font 字体, 然后打开配置文件可以看到最后多了下面几行:
1
2
3
4
5
6
7
# BEGIN_KITTY_FONTS
font_family      family="ComicShannsMono Nerd Font"
bold_font        auto
italic_font      auto
bold_italic_font auto
font_size        20.0
# END_KITTY_FONTS
主题
有了好看的字体,接下来我们找一个好看的主题,平时使用的时候看着自己喜欢的主题,赏心悦目,编码效率都会提高不少。
感谢开源社区有人帮我们总结了各种好看的主题 kitty-themes
安装主题
根据上面的 repo 执行下面的脚本就可以安装好主题了。示例里面使用的是一个叫 Floraverse 的主题。
1
2
3
4
5
6
7
git clone --depth 1 https://github.com/dexpota/kitty-themes.git ~/.config/kitty/kitty-themes

cd ~/.config/kitty
ln -s ./kitty-themes/themes/Floraverse.conf ~/.config/kitty/theme.conf

# 在 kitty.conf 文件里面添加下面一行
include ./theme.conf
切换主题
那问题来了,怎么切换主题呢?
仔细看上面的脚本, 切换主题的命令是 ln -s ./kitty-themes/themes/Floraverse.conf ~/.config/kitty/theme.conf, 你只需要把 Floraverse 改成你喜欢的主题名字就可以了。
我决定结合 fzf 来写一个脚本来切换主题。
下面是一个 zsh 的脚本, 简单的把它丢到 ~/.zshrc 文件里面, 然后执行 source ~/.zshrc 就可以使用了。
1
2
3
4
5
6
7
8
9
10
11
12
13
change_theme () {
    local themes_dir="$HOME/.config/kitty/kitty-themes/themes"
    local theme_conf="$HOME/.config/kitty/theme.conf"
    local selected_theme=$(ls "$themes_dir" | fzf)
    if [[ -n "$selected_theme" ]]
    then
        rm -f "$theme_conf"
        ln -s "$themes_dir/$selected_theme" "$theme_conf"
        echo "\033[32m✓ Theme changed to: $selected_theme\033[0m"
        kitty @ load-config
        echo "\033[32m✓ Kitty config reloaded\033[0m"
    fi
}
上面脚本里面的命令
kitty @ load-config是用来重新加载 kitty 的配置文件的。 这里用到了 kitty 的远程控制功能,kitty 提供了一个 socket 接口,可以通过kitty @命令来控制 kitty。 比如kitty @ set-colors可以动态修改颜色,kitty @ set-window-title可以修改窗口标题等。 要使用这些功能,需要在 kitty 的配置文件中开启allow_remote_control yes。
效果如下图:
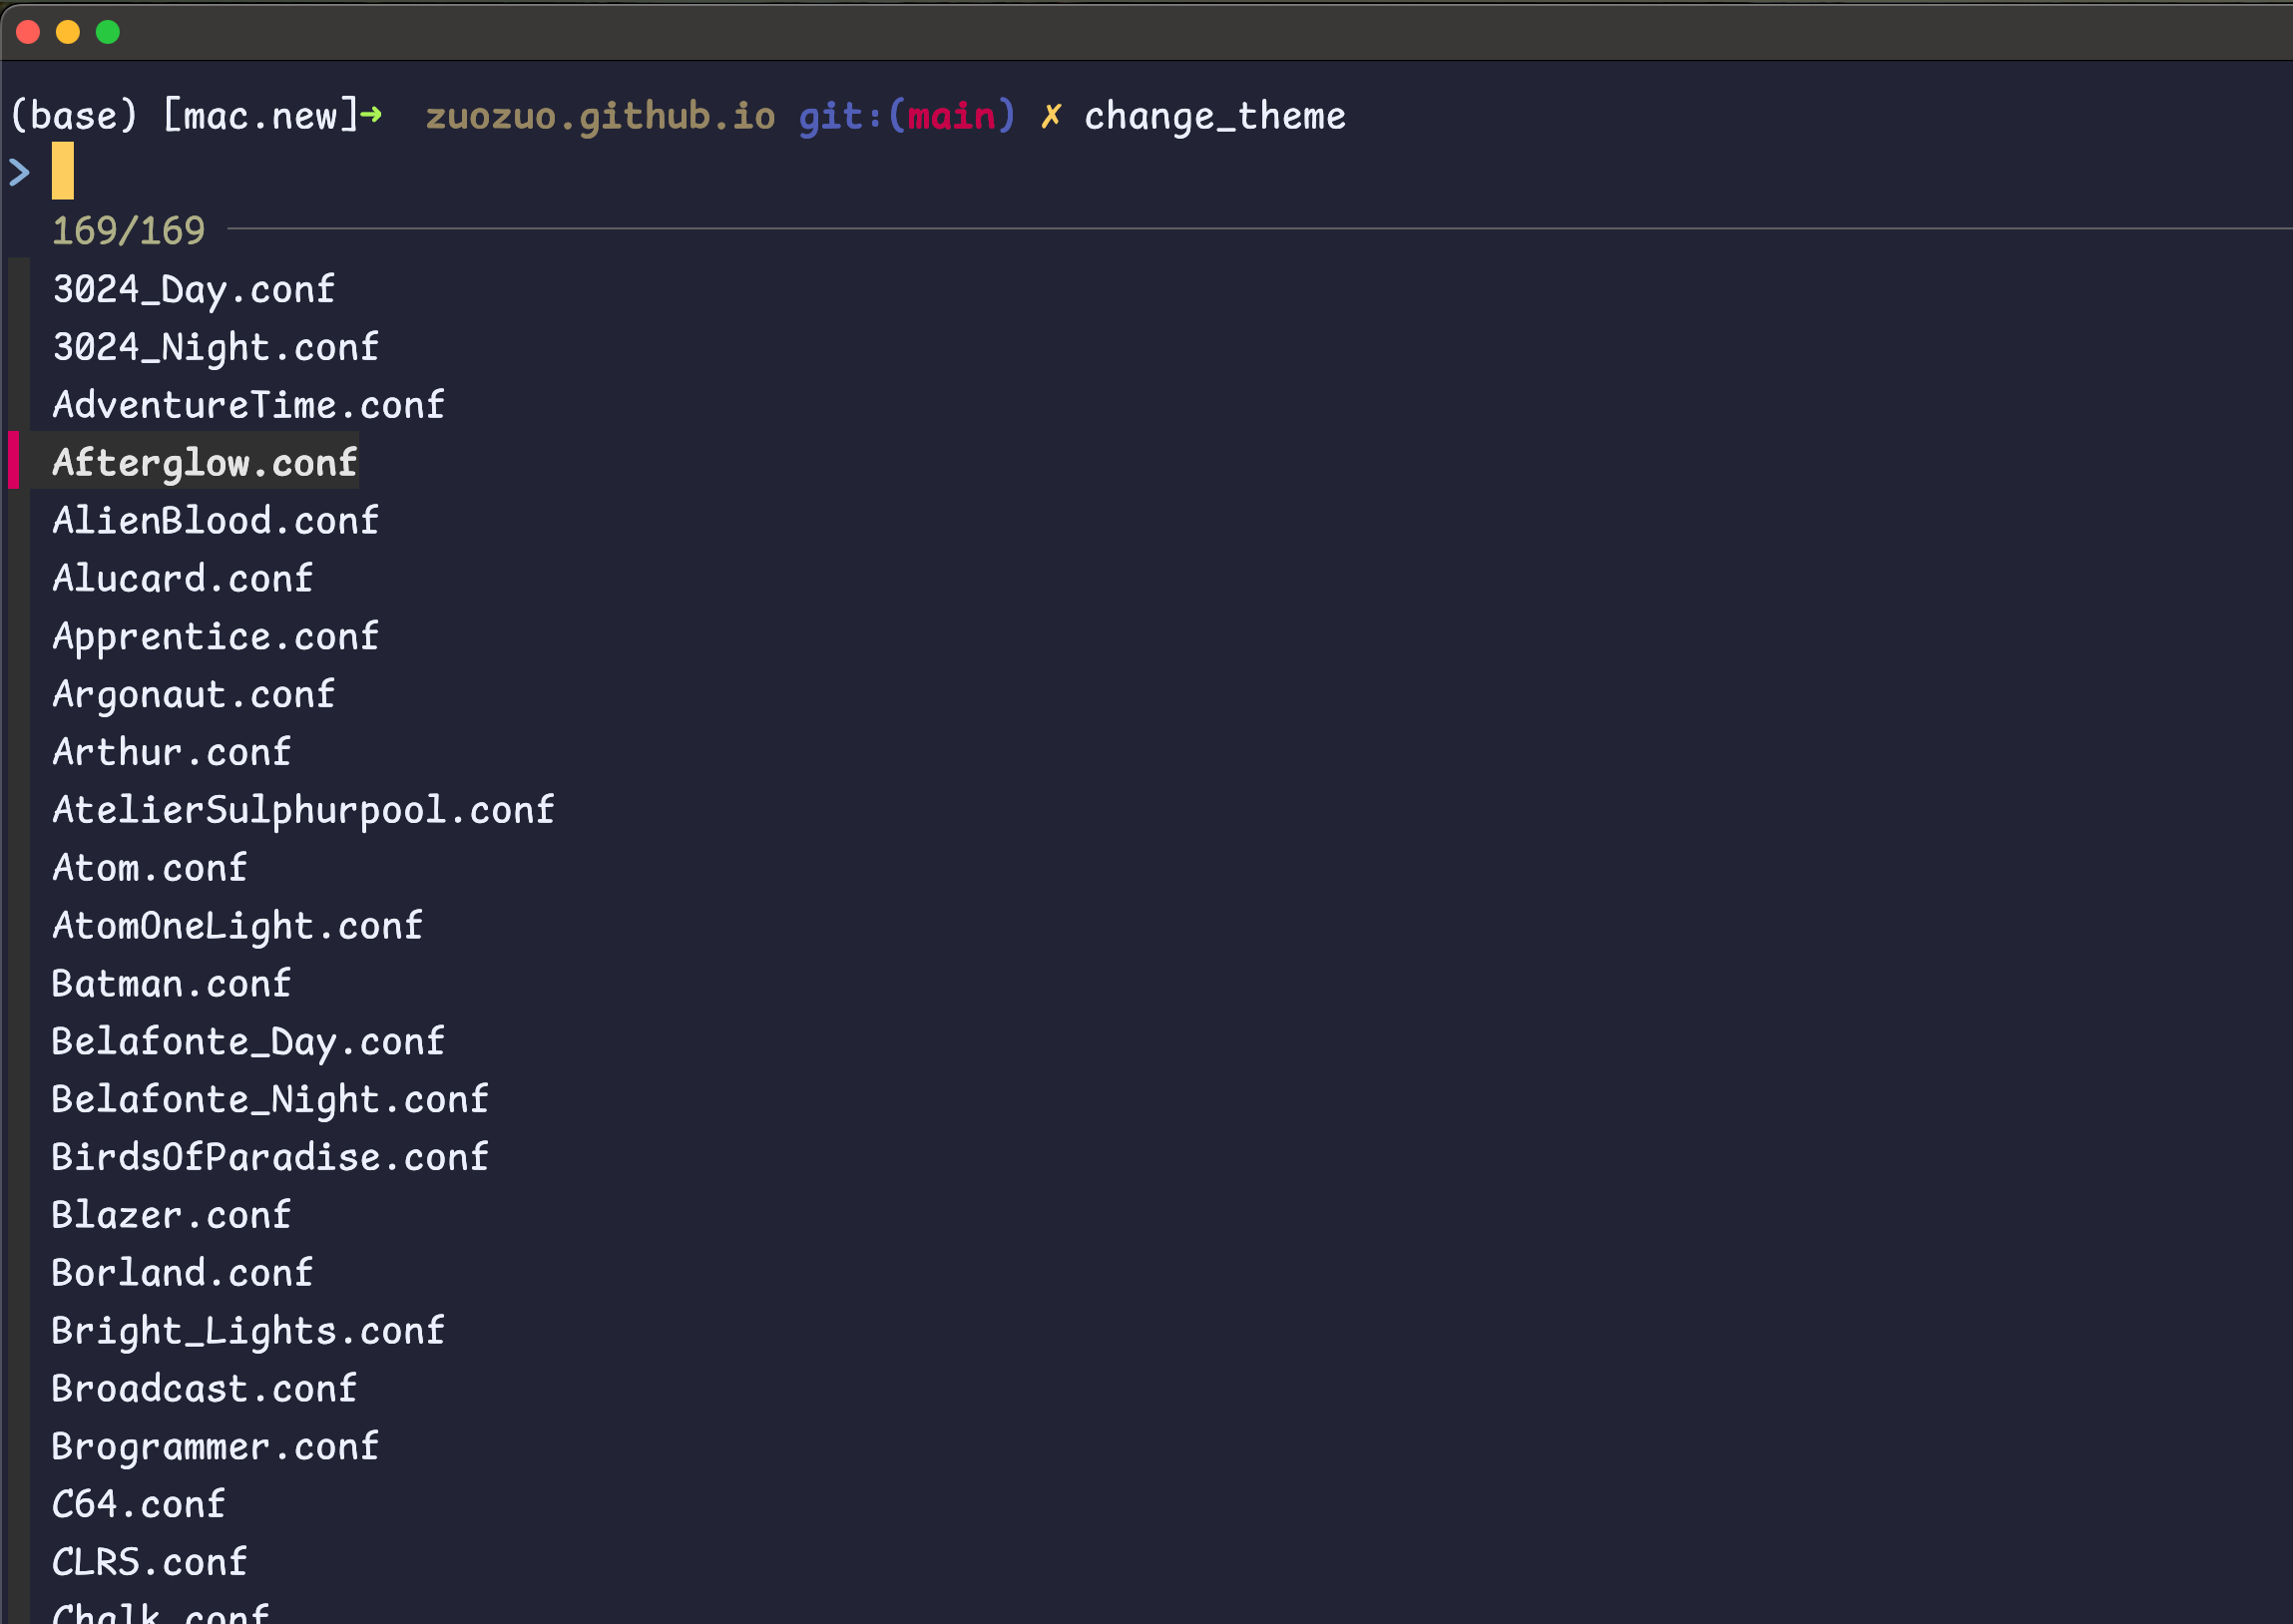
有趣的是写完了这个脚本之后, 我才发现 kitty 自带了一个命令行工具来切换主题:
1
kitty +kitten themes
比我自己写的脚本强大多了,都怪 cursor 写脚本太快了,男人果然不能太快。
键位映射
模仿 Iterm2 的 tab 管理快捷键
Kitty 的键位映射非常灵活,Iterm2 里面我们比较习惯把 CMD-number 键映射成切换标签页,这在 kitty 里面非常容易实现:
1
2
3
4
5
6
7
8
9
10
11
12
13
14
map command+t                     new_tab_with_cwd !neighbor
map command+shift+left            move_tab_forward
map command+shift+right           move_tab_backward

map command+1                     goto_tab 1
map command+2                     goto_tab 2
map command+3                     goto_tab 3
map command+4                     goto_tab 4
map command+5                     goto_tab 5
map command+6                     goto_tab 6
map command+7                     goto_tab 7
map command+8                     goto_tab 8
map command+9                     goto_tab 9
map command+10                    goto_tab 10
这里不得不提到一点:kitty 的配置文件设计得非常用户友好,操作的命令非常直观,比如 new_tab_with_cwd 就是新建一个标签页,并且使用当前目录作为工作目录。 作为一个有产品思维的开发者,我非常喜欢这种设计。
自定义 tab 样式
kitty 的 tab 样式非常丑, 但是我们可以通过自定义样式来让它变得好看。
1
2
3
4
5
6
7
8
9
10
11
12
13
14
15
16
17
18
19
20
21
22
23
24
25
26
27
28
29
30
31
32
33
34
35
36
37
38
39
40
41
42
# The edge to show the tab bar on, top or bottom.
tab_bar_edge                      bottom

# The height of the tab bar.
tab_bar_height                    40

# The margin height of the tab bar.
tab_bar_margin_height             0 0

# The style of the tab bar.
tab_bar_style                     separator

# The alignment of the tab bar.
tab_bar_align                     left

# The maximum length of the tab title.
tab_title_max_length              27

# The template for the tab title.
tab_title_template                " {index} {title[title.rfind('/')+1:]}"

# The template for the active tab title.
active_tab_title_template         " {index} {title[title.rfind('/')+1:]}"

# The font style of the active tab.
active_tab_font_style             bold

# The background color of the tab bar.
tab_bar_background                #36a3d9

# The background color of the inactive tab.
inactive_tab_background           #36a3d9

# The foreground color of the inactive tab.
inactive_tab_foreground           #0e1419

# The background color of the active tab.
active_tab_background             #0e1419

# The foreground color of the active tab.
active_tab_foreground             #E7C547
效果如下图:
值得关注的是上面的 tab_bar_style 配置:
1
2
3
4
5
6
7
8
9
10
11
12
13
14
15
16
17
18
19
20
21
#: fade
#:     Each tab's edges fade into the background color. (See also tab_fade)
#: slant
#:     Tabs look like the tabs in a physical file.
#: separator
#:     Tabs are separated by a configurable separator. (See also
#:     tab_separator)
#: powerline
#:     Tabs are shown as a continuous line with "fancy" separators.
#:     (See also tab_powerline_style)
#: custom
#:     A user-supplied Python function called draw_tab is loaded from the file
#:     tab_bar.py in the kitty config directory. For examples of how to
#:     write such a function, see the functions named draw_tab_with_* in
#:     kitty's source code: kitty/tab_bar.py. See also
#:     this discussion <https://github.com/kovidgoyal/kitty/discussions/4447>
#:     for examples from kitty users.
#: hidden
#:     The tab bar is hidden. If you use this, you might want to create
#:     a mapping for the select_tab action which presents you with a list of
#:     tabs and allows for easy switching to a tab.
在 custom 样式里面, 你可以使用 tab_bar.py 来定义 tab 的样式, 具体怎么玩可以参考 Share your tab bar style
非常的精彩,网友的智慧是无穷的,开源让世界更美好!!!
强大的可扩展能力
kitten 是 kitty 的一个重要组成部分,它是一系列用 Python 编写的辅助程序的统称。这些程序为 kitty 提供了额外的功能扩展。 你可以把 kitten 理解为 kitty 的”小猫咪”,它们是 kitty 这只”大猫”的助手。
每个 kitten 都是一个独立的 Python 脚本,专注于完成特定的任务。kitty 通过 kitty +kitten 命令来调用这些助手程序。 比如:
kitty +kitten icat- 在终端中显示图片kitty +kitten themes- 主题切换器kitty +kitten diff- 文件对比工具kitty +kitten unicode_input- Unicode 字符输入kitty +kitten hints- 快速打开链接或选择文本
kitten 的设计理念是模块化和可扩展性。除了使用内置的 kitten,你还可以编写自己的 kitten 来扩展 kitty 的功能。 这种设计让 kitty 保持了核心功能的简洁性,同时又能通过 kitten 实现强大的扩展能力。
最有趣的是你可以使用 kitten @ 来远程控制 kitty, 比如 kitten @ set-colors 可以动态修改颜色,kitten @ set-window-title 可以修改窗口标题等。
由此可见,kitty 的远程控制功能非常强大,完全具备可编程的能力。
高级功能
1. 会话管理
Kitty 支持保存和恢复会话:
1
2
3
4
5
# 保存当前会话
kitty @ ls > ~/.config/kitty/session.conf

# 启动时恢复会话
kitty --session ~/.config/kitty/session.conf
2. 远程控制
Kitty 提供了强大的远程控制功能:
1
2
3
4
5
# 在新窗口中打开文件
kitty @ launch --type=tab --cwd=current vim myfile.txt

# 修改窗口标题
kitty @ set-window-title "My Window"
3. 图片显示
Kitty 支持直接在终端中显示图片:
1
2
3
4
5
# 显示图片
kitty icat image.png

# 显示图片预览
kitty +kitten icat image.png
与 Neovim 集成
Kitty 与 Neovim 的集成非常完美。以下是一些推荐的 Neovim 设置:
1
2
3
4
5
6
7
-- init.lua
vim.opt.termguicolors = true

-- 使用 kitty 终端特性
if vim.env.TERM == 'xterm-kitty' then
  vim.opt.mouse = 'a'
end
结论
Kitty 是一个强大而现代的终端模拟器,特别适合那些追求性能和可定制性的用户。
虽然它的学习曲线可能比 iTerm2 稍陡,但一旦掌握了基本配置,你就能获得一个更高效、更灵活的终端体验。
对于 Vim/Neovim 用户来说,Kitty 的键位映射和性能优势尤其明显。
在下篇文章中我们再讲 Kitty 的一些高级配置和如何配置 Kitty 来更好的与 Neovim 集成。